Editing an AsciiDoc file in IntelliJ
Adding a file to a project and editing AsciiDoc content in an existing project.
This is part of the step-by-step series to set up a technical writing environment with IntelliJ and the AsciiDoc plugin. See the page Setup for technical writing for an overview of all steps.
Prerequisites
This assumes that IntelliJ IDEA is open with an either empty project or a project with some existing content. See Opening a project in IntelliJ IDEA on how to do this.
Adding an AsciiDoc file
This creates a new file in an existing project that can later be edited.
To add a file:
-
Right-click on a folder in the project view where the new file should appear.
Assuming the user wants to create a file in the root folder empty project “helloworld”, they would click on the bold text “helloworld” (see screenshot below).
-
Choose from the context menu the item .
If the menu item for the AsciiDoc file is missing in the steps below, the AsciiDoc plugin wasn’t installed in the prerequisite step. Rectify this by following the steps in Installation via JetBrains Marketplace via the IDE’s settings, then return here to continue.
-
Enter the new file name, and choose either an empty template or the Article template.
-
Press Enter
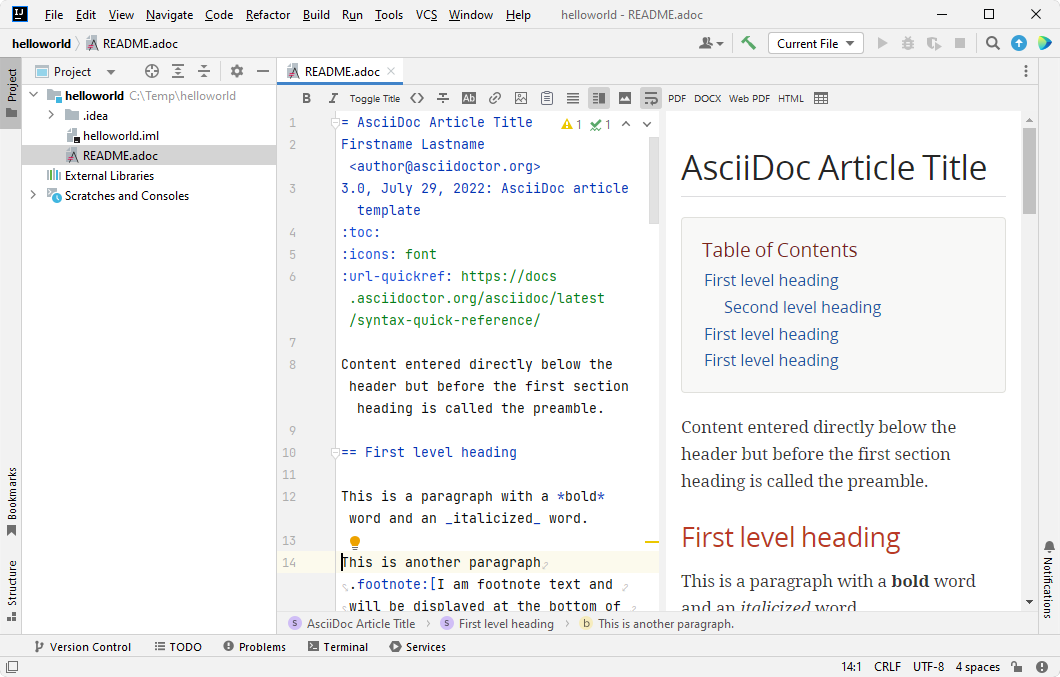
When choosing the article template, and using a file name README.adoc, the result should look similar to the following screenshot.
Configuring the Editor
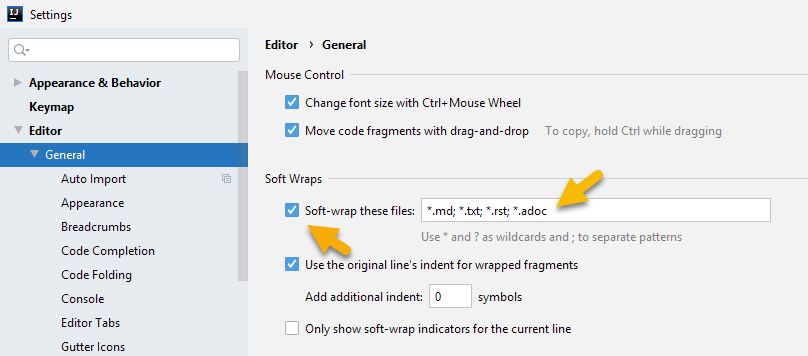
An AsciiDoc recommended practice is to have one sentence per line. This can lead to lines larger than the editor’s width.
Using soft wraps will make the content readable in the editor, as each line wraps at the width of the editor.
Go to and enable soft wrap for the file extension used in the project for AsciiDoc files (usually *.adoc).
IDE menus and tool windows
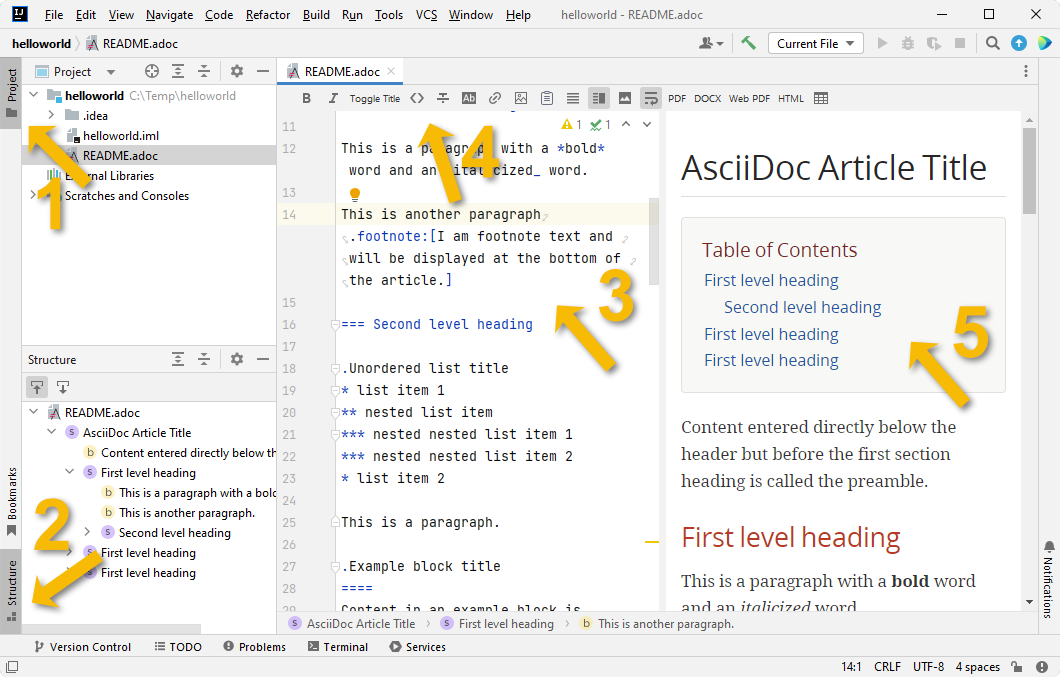
This section describes the most important tool at the borders of the IDE’s window as shown below.
-
The project view is a tree view of all files in the project. Clicking on “Project” hides and shows this view. This works with all tool windows.
-
The structure view displays the structure of the current AsciiDoc file in the editor. Clicking on “Structure” hides and shows this view.
-
In the editor window, the user can update the text as needed.
-
A toolbar at the top allows formatting of content and toggles the preview. Hover with the mouse over the different icons until a description appears.
-
The preview shows the content from the editor.
Editor
In the editor, the user can update the content. It has syntax highlighting to improve legibility. On the left of the editor window, small icons allow the user to collapse sections and icons to expand sections. Line numbers help with the orientation.
When the IDE suspects a problem, for example, a missing image or a broken reference, it underlines the text with a red line. It uses similar highlighting for suspected spelling and grammar errors.
The main things to know about the editor are:
-
When the user types the three letters ad-, the editor suggests live templates for common AsciiDoc structures like lists, links and source code. Continue typing to narrow down the list, use the up and down arrows to highlight an entry, and use Enter to select an entry. See Live Templates for additional information.
-
When typing a file name as part of an image macro or a reference, Ctrl+Space ^ Space shows a list of suggestions. Press Tab to replace the text in editor for the current reference or press Enter to insert the text in the editor.
-
Using Alt+Enter, the user can trigger context-specific features of the IDE, especially when there is an underlined text that indicate warnings and errors. Those features range from creating a missing file to choose a correct word when there is a spelling or grammar mistake.
-
After placing the cursor on an include-macro or a reference and pressing Ctrl+B ⌘ B, the IDE opens that file in a new editor tab.
-
To rename an attribute name, file name or reference, place the cursor on it and press Shift+F6 ⇧ F6, and the IDE renames the reference in all places if the checkboxes are enabled in the dialog that pops up after the key was pressed.
-
To format the complete file or a selection of text, press Ctrl+Alt+L ⌘ ⌥ L. The default configuration removes unnecessary blanks and applies the one-sentence-per line rule. See Reformatting Content for details.
To learn more about the editor’s features, read the page Editing AsciiDoc Content.
To learn about the shortcuts in the IDE and the editor, read the page Using Hotkeys.
Preview
Once the user places the cursor in the editor, the preview scrolls so that it shows this paragraph in the preview.
The main things to know about the preview are:
-
Clicking on an external link opens it in a new window of the system’s browser.
-
Clicking on an internal link opens the target in the editor.
-
Clicking on text content places the cursor in the editor in that paragraph. If the content is from an included AsciiDoc file, the editor opens that file in a new editor tab.
To learn more about the preview’s features, read the page Previewing content.
Further reading
Continue to Collaborate with others using IntelliJ’s Git integration for the next step of this series.